
Analysing a maze
One of the most noticeable differences between top-end players and the rest of the competition is their ability to adapt to a new maze as if it were their own. It takes years of playing across many different mazes to develop these skills. Most players only get the chance to play in one or two arenas regularly, so adapting to a new arena for a competition can be a big hurdle.
When approaching a new maze it can be hard to know where to start. In this article I am going to go over the main steps to analysing a maze in order to be prepared for a tournament. As an example, I will be using the arena map from ZLTAC 2015 Bendigo.
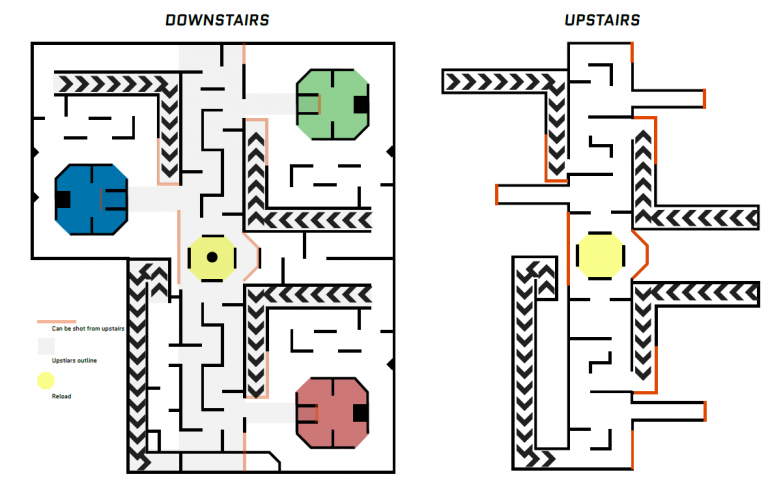
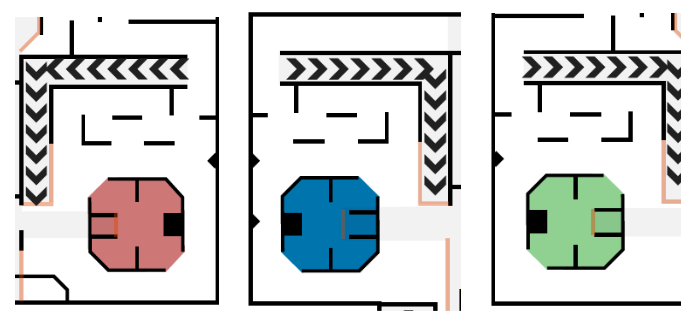
This was a polarising arena. Some people loved it, while others struggled throughout the competition. The year was characterised by several strong teams underperforming while some underdogs did surprisingly well. I believe that the difference came down to how well teams adapted to an arena that had some key differences to arenas that had been played in the past. The Bendigo arena has 3 identical bases (red base was a mirror of green and blue) on the ground floor, and an upper level with significant power to affect the play on the ground level. Since the bases and the surrounding play areas were largely identical, the game was largely won and lost by how well teams leveraged their use of the rest of the arena to their advantage.
Some unique characteristics of the Bendigo maze:
All three bases and their immediate surroundings were the same shape, with red being a mirror image of blue and green.
The right hand side of the maze was a mirror. This made red and green fairly equivalent, with blue being wedged between them.
The upstairs area included tunnels above the base areas that were inside the evacuation zones. These positions could shut down about half of the normal take spots in each base.
Upstairs positions covered the entire front door of each base and a good amount of the play area around each base.
There are only 2 reloads in the maze, one upstairs and one downstairs.
Step 1: Analyse each base separately
This is an article in its own right, but the main point is to determine how each base will play with different numbers of people at them. For example, how many bases go down in a 2v2 attack/defence scenario. What happens if you add a third team? Remember there are 216 combinations of Red/Green/Blue players that could be at a base at any given time, and that’s without taking into account how they’re playing.
The main things you are looking for at a base are:
How defensible is it?
How easy to attack is it?
How close are the reloads?
What do the attack vectors look like?
Once you have an idea of how each base might play, you will be able to start making some progress analysing the maze as a whole.
Step 2: Find out where the high value spots are
Once you know what setups at each base will look like, you can begin to see which positions in the arena hold tactical value beyond the bases. Examples of high value spots in the maze can include:
Any position with good cover, that can get a high tag ratio.
In the Bendigo maze, the upstairs had massive potential to get huge pack scores while maintaining a high tag ratio. A lot of teams won games from utilizing this area correctly.
Any position that can control a base door, or whole side of a base.
These tend to be further away from doors, but with full view of the door. Often with this type of position, if an attacker moves back to deal with it, the defenders will be able to stop them returning to a position closer to the door. Bendigo had lots of this type of position, as defenders could shoot anyone that passed in front of the base door from inside, and there were lots of positions that could cover a door from a distance. Also at Bendigo, upstairs was this type of position as each base’s front door could be fully covered from there.
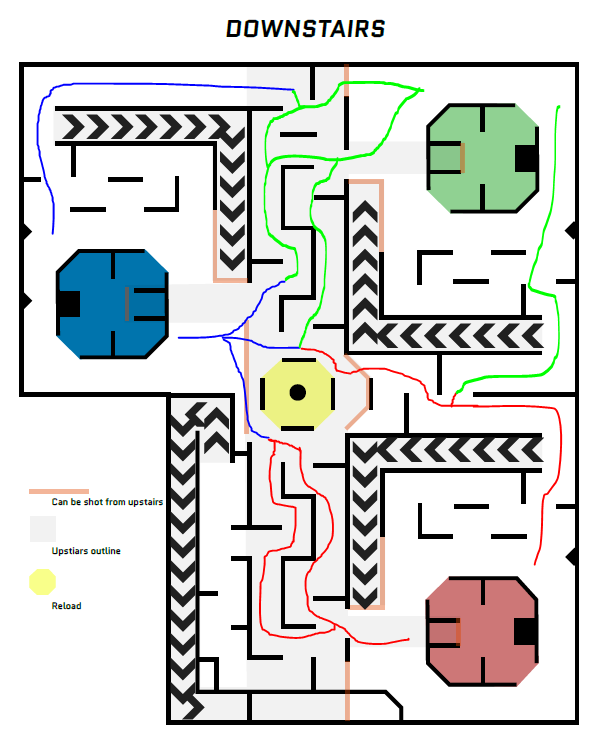
Choke points in the arena.
A choke point is a place in the arena that players might have to move through to change bases. In Bendigo there was 2 choke points for each base. Players could come through the middle of the maze, or around the outside of the maze. Covering these points correctly allows your team to know when players are moving around the maze, and where they are going. They can also double as good places for your defenders to move out to when you aren’t being attacked.
Step 3: Start formulating some strategies to win games
Winning games is about 2 things. Base score and pack score. Base score is the amount of points your team gets from bases compared to the other teams. Similarly, pack score is how many points your team scores from shooting other players compared to the other teams.
You need to decide, based on how the maze is layed out and your team’s strengths and weaknesses, how your team is going to win games.
If a base is very defensible, but doesn’t have many options to get to high powered positions around the maze, you need to figure out how to use that to your advantage. This is often the case for the “middle” base. For example in Bendigo, Blue has a marginally stronger defensive than either red or green. This is due to its proximity to the reload. It also has a lower capability for its defenders to push out and get pack points at the other bases, also due to its proximity to the reload, which doubles as the main choke point of the maze.
The priority for Blue could be to keep the game at your base as much as possible, while reducing the other teams’ chances to interact without your interference. If you manage to get both teams attacking you at once, your attack will be able to attack either base, with very little problems from the other defenders, since your base is between them.
If a base is hard to defend, you have a few options. In Bendigo, some teams found defending red base harder than the others, due it it being a mirror image (handy if you’ve got a lefty). In this scenario, you could stack a heavy defence to discourage other teams from attacking you, using the quiet times as opportunities to show up in numbers at other bases. This type of strategy requires a high level of coordination and can go badly wrong if not executed correctly.
Conversely, if defending a particular base is not working, you could consider pushing a heavier attack with the goal of getting 10 bases. In this instance your defence’s goal would be to slow the other teams down, but maximize their pack score through denies and high tag ratio positions. This strategy would result in high bases and high pack score, meaning you are likely to win if the game goes to high bases. This type of strategy is countered by heavy defences, even if only temporarily, since they will tank your pack score. In Bendigo, it was often a good idea to have an extra player upstairs, as they could support attack and defence while maintaining a high tag ratio, especially if uncontested for the spot.
In reality, arenas are usually more complicated than this, and you will need to develop your strategies not only for the base you are playing out of, but also for the teams you are playing against. Having a good understanding of the bases and the overall maze should help with this process.
“If you manage to keep that top team from getting too many bases or pack points from your weaker opponent, you might just get that upset you were looking for.”
Step 4: Plan Individual games
Having a good understanding of the bases and the overall maze is only the tip of the iceberg when it comes to individual game planning. You need to consider not only the base you are playing out of, but also who your opponents are, and what bases they are playing out of. In the later stages of the tournament this is especially important, as by paying attention you can spot patterns and gain significant advantages.
If you don’t know the individual strengths and weaknesses of a team, it can still help you plan your game to think about the relative skill of your opponents. In general, another team is either better than you, worse than you, or about the same as you. When planning your game you need to consider that your tag ratio against players worse than you will be positive, better than you will be negative and about the same as you will be even. This means that when you consider the points available by attacking or defending against a specific team, you need to factor in the pack-point advantage or disadvantage it will get you. On top of this, you should consider a similar relationship with bases throughout the game.
The best example of this is when you come up against one team better than you, and one team worse than you. If you play the game right, you can maximize your interaction (both attack and defence) with the team you are better than, and minimize it with the team you are worse than. This maximizes your score ratio, and most likely bases too. If you manage to keep that top team from getting too many bases or pack points from your weaker opponent, you might just get that upset you were looking for.

Step 5: Profit
Possibly the biggest advantage to a well-planned game is the increased ability to analyse what went well, and what went badly. Make sure you tweak your strategies throughout the competition to remove things that aren’t working. This is also a good chance to talk about how other teams react to what you’re doing, and how to stay one step ahead. If you have time, you should consider individual teams, especially those near you in the ladder, since you’re more than likely going to be coming up against them come Finals Day.

