Map Chat II

This is the second edition of my Map Chat series, where we analyse base play in hypothetical scenarios. If you haven’t seen the first article yet, you can find it here. Like last time, I have five reviewers giving their opinions on how a specific scenario will play out. This time around we’re looking at a 3 verses 3 at Red Base in Belfort, France. This is the maze where Worlds 2017 was played.

Strategically, a three-player attack is a high-risk, high-reward offensive strategy. In theory they can get a lot of bases very quickly against the standard three-player defence. However, their base will almost certainly be going down at the same time. If their attack gets stalled out, they’ll be in a bad position. We’re not here to talk strategy though. This analysis will be purely tactical for the remainder of the article.

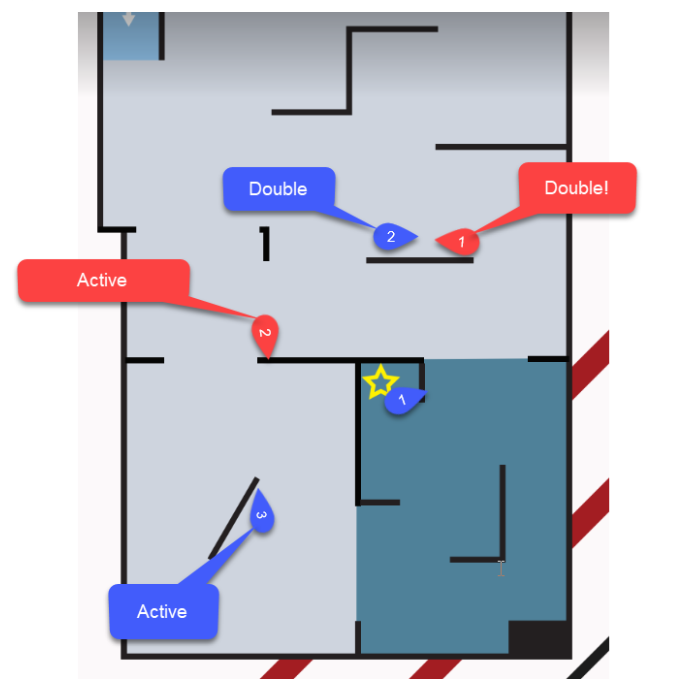
The scenario is below. Feel free to take a second to consider who has the advantage here, as well as how each team should play out the next few spawns, before reading on.

3v3 with Red defending

Question 1: Who Has The Advantage Here?

Xeta (Joel from Dunedin, C player, has not played this maze): Red

Puzzles (Margie’s little sister, E player, has not played this maze): Red – they get extra powers from standing near a Cobras sign

Mumin (Top tier Swede from Feydakin, A player, has played this maze): Red

Ibo (Maroon, famous zone caster, A player, has not played this maze): Red

vDark (Cobras, A player, has played this maze): Blue is very likely to get a base here

Summary: Unlike last time we actually have some disagreement over who has the advantage. If I could have asked a follow up question, I would have added “and why” to this question. Based on the answers to the next questions, it looks like the consensus is that Blue will get a base here. Perhaps Red has the advantage despite this?

Question 2: What Should Blue Do?

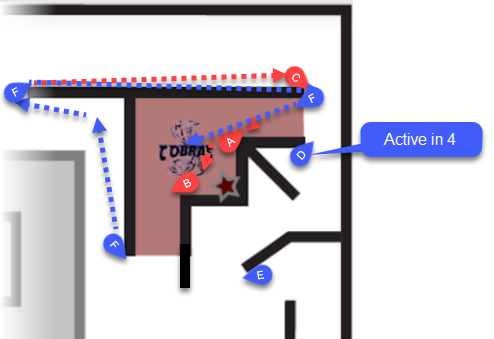
Xeta: F should take out C, A and B in that order. E should probably wait for F to take out C at any rate.

Summary: Joel has spotted the back route play for F to get a free kill on C. From here he wants F to continue his run past C into the base.

Xeta's plan: Stand back and let one guy take care of everything
Puzzles: F should shoot C from behind, then enter the base from C. E should maybe try to break either side by throwing carrots as a distraction. Summary: Puzzles has also spotted the back route to take out C but doesn’t have much of a plan for getting into the base.
I checked and the rulebook doesn't include anything about carrots
Mumin: D should stay put. E should move up to the left entrance and let shoot his shoulder. Then launch a stun block attack along his wall so the defender won’t see him until it’s too late. F will then follow inside while D remains. Summary: Mumin has focused on how to get in rather than dealing with the outside player. He has explained a Worlds timing stun break on B’s door. If the outside player stays where he is then he will be irrelevant to this play. If he was worried about it, he could have F move around and take C out via the back channel, then move back and do the same play.
There is nothing scarier than facing down a stun-break from an expert. Do you have the nerve to time your shot correctly?
Ibo: I don’t know how well this base would work on ZLTAC settings, though it would work on Worlds settings. Blue E essentially needs to either occupy C‘s spot or the opposite side to F and they would need to set up to lunge inside the base with the other player holding position and going for the gun shot on the defender who is covering themselves. Summary: I should note that I asked each player to do the analysis based on their preferred timing and settings, so there may be a few places where the system affects the answers. Quite similar to Mumin’s analysis, Ibo has ignored the outside player. A good team will often just focus on what the break looks like. It’s essentially a 3v1 outside, so the specifics of how to deal with C are less relevant. I actually think the break Ibo has described was the most reliable one at Worlds, which is impressive since he’s never played in this arena.
Picture this: Ibo doing lunges
vDark: T=0: F moves to get the shot on C. T=3: D moves to duel C on that side of the door. E moves to where D was. T=3.5: Blue F shoots C down the corridor and then heads back to their original position. T=4: D covers through the base to pin A while E makes a tight play on A. This would normally be successful. T=5: If it’s a double, D can move into the base to shoot B and take the base. F should come in the front door at the same time so that if B moves to cover D, he can make a play on the other door. If D is not successful in taking the base, they should make sure to call C‘s position as they will likely spawn before the base is finished by their team mate. This should prevent any deny. Summary: It’s a little cheeky having F take C out at the perfect time. In reality F is unlikely to know to hold off shooting C until D is about to spawn. Note that this doesn’t actually matter much, since Blue could just take C out a second time once everyone is up and in position. Everything else will play out the same way, but take one spawn longer in total. This break is the same as Ibo’s, with a bit more detail about setting it up and how to play after the break happens to minimise the deny chance.
Helppo

What can we learn from all this?

I think it’s interesting that the newer players basically detailed dealing with the outside player but provided no details on how to get in the base other than “break the door”. While the analysis from the experienced players focuses almost exclusively on how the break would work. With just a single defender outside and the inside players unable to contribute much until the break happens, this is a pretty reasonable approach to take for analysis. The attackers are free to set up whatever break they want.
  1. Here’s a break I prepared earlier: This is one of the most important things you can learn in training and map analysis. Everyone in your team should be aware of what the strongest break setups look like and be constantly working to set these up. This defence will fall almost immediately to a good setup but will last quite a while against a team coming up against it without a plan.
  2. Don’t be a hero: You might be able to reliably solo break two defenders at your local members’ night, but in a high-level team game there are doors and bases which you will never get into by yourself. If you’re a B player with excellent pack skill but can’t seem to make it on an A team you might be falling into the trap of wasting opportunities with solo attempts instead of waiting to set up a coordinated move with your team.

Question Three: What Should Red Do?

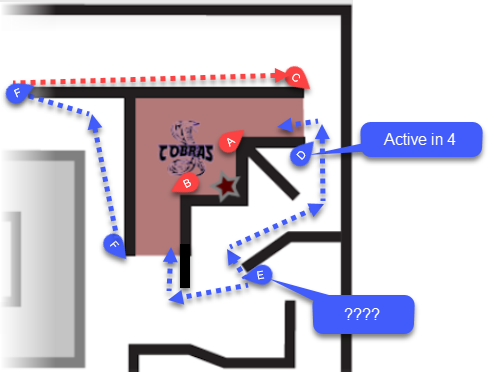
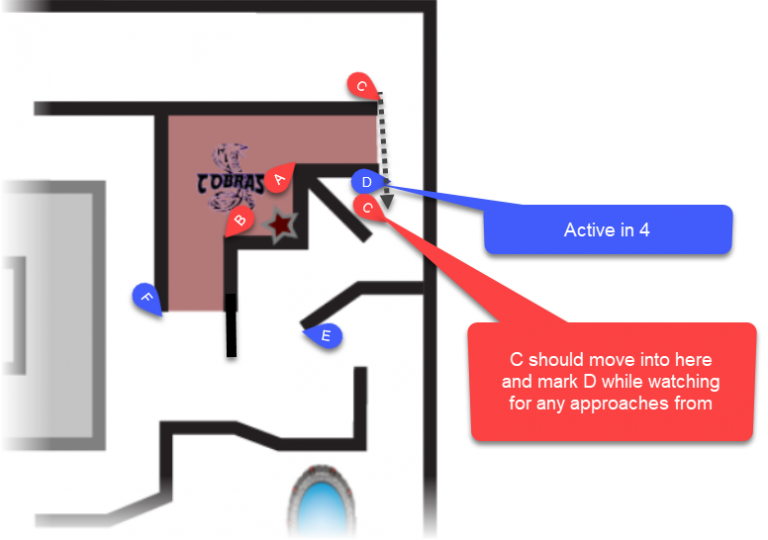
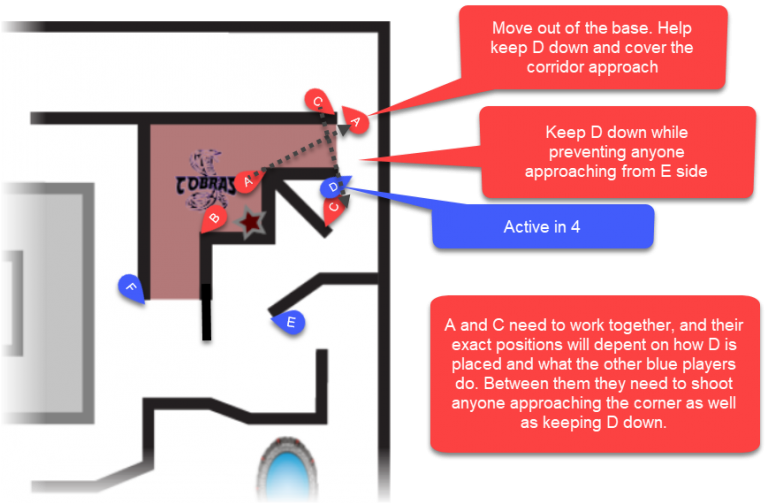
Xeta: C should move close to D. They can cover D and E, and sneak around or through an attack by F.

Summary: I think hiding in that corner with D is the best play from C. Blue probably can’t get a base while D is down and C is up. C should do his best to keep D out of the action without getting hit by F or E. Note that Xeta plays Nexus, where he could conceivably keep D down for a long time. On Helios the next spawn would probably be a double leaving E and F free to attempt a two player break of their choosing. 

Xeta's strategy
Puzzles: A and B should hold position. C should go back, shoot F, go forward and try to shoot E, then D depending on how long it’s taken them I guess… although that’s all depending on how much C knows. Basically, I think C should be wandering around the base rather than staying in a single location. Summary: C should take the back route and try to get F. This is risky if F is making the same play, since he will likely have the advantage when they meet. Having your outside defender be mobile is a pretty common play, but they must be careful not to move around randomly. Sooner or later you will get in a position that costs a base. I like that Puzzles points out the lack of knowledge in this scenario. C is essentially playing blind which is difficult.
What did I just say about being a hero?
Mumin: The only thing they can do is time their shot. Player A isn’t really useful at the moment, so he must be ready to flip fire at the other entrance. Summary: Mumin is assuming that Blue will try the break he suggested earlier. Since C and D will be tied up with each other, the players under the base have to deal with this.
Mumin's plan

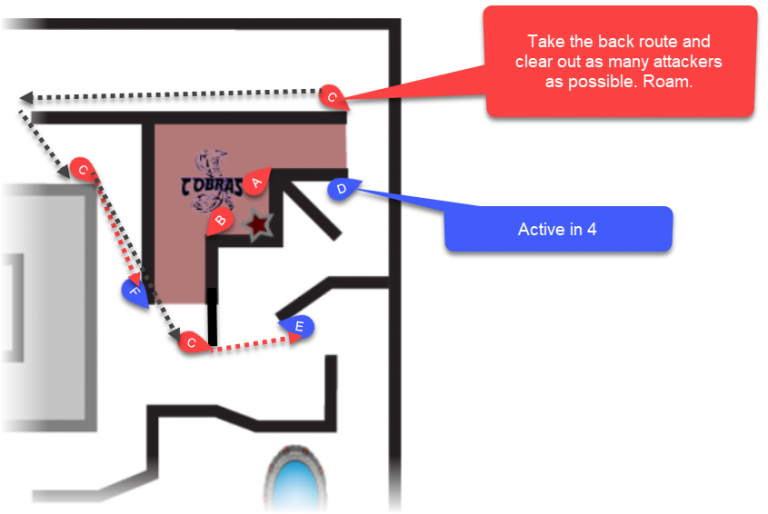
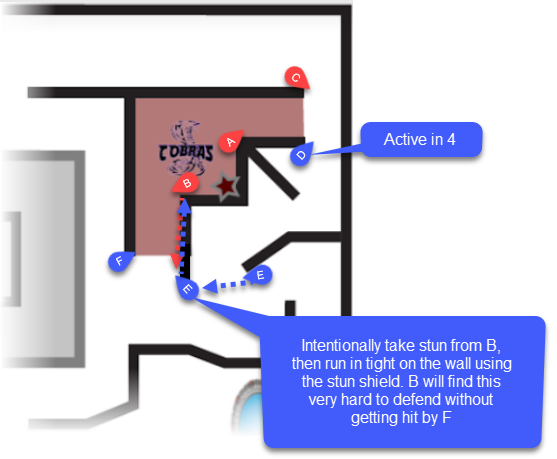
Ibo: Hold the 2 inside and C should just be a nuisance and try not to allow blue to set up the pin.

Summary: Similar to what Puzzles said, keep the inside defenders and have the outside guy roam. I like that Ibo pointed out the specific role of the roamer: stop them from setting up a break.

vDark: In this position either C should try beat F to the back corner, or B should come out of the front door to shoot either E or F in the back depending on where in the sequence they are up to. However, in this configuration Red has no way of knowing where the 2 blue players out that side are at any given time, and if they hadn’t moved, B will be shot. They should still make one of those plays because the base will almost certainly go down if they don’t, but it might not if they do. Summary: Somebody on Red needs to make a big play. Either C can run around and try to counter F, or the defender can come out and do something. This relies on the guy under the base correctly guessing what the outside attackers are doing, since they won’t have vision or comms about this.
I knew we should have subbed vDark on Red games
Popeyes: I’m including my own since I’m surprised nobody mentioned this option. C needs to move forward so that he’s not exposed to F. He should know there is someone in that corridor based on the calls from B, but even if he doesn’t, needlessly exposing himself isn’t a good idea. He needs to keep track of D as well as watching towards the side where E is. A should move out to that corner as well and split his attention between watching D and keeping track of the corridor (where F would come from). If Blue tries to set up a break at B’s door, then A can move into the base and play on the entrance wall, backing up B. This way, D will be facing a 2v1 when he spawns. Blue will need to send another player to that back corner to deal with this setup, so he should be shot on his way there.
How to play 2 in 1 out: Switch to 1 in 2 out

What can we learn from all this?

Now that we’ve reached the end of the article, I think I understand why four out of five of our reviewers said Red had the advantage here. All three of their players are active, they have two inside the base and their outside guy is in a pretty good spot. What’s interesting is, when you start digging into it, it really looks like most people agree that Red is in serious danger of losing a base.
  1.  Think about what your opponent is doing. We got a lot of different opinions about what the outside defender should be doing, but ultimately he has one job: Prevent the opposition attackers from setting up a take opportunity. In this case it means knowing what the break setups look like and shutting those down before they happen. In another base it might be taking care to stay in deny range. Too many players play this role by just hanging around their assigned door, dueling, and calling. This is a pretty good start, but to really master defence you need to think a little harder.
  2. Vision is important. In this scenario, there is a lot that the outside defender could be doing to prevent the base going down. But a lot of it relies on a lucky guess about where his opponents are. The players inside the base can’t see much so he will need to do his own scouting. We get two lessons out of this one: First, when planning your defence, make sure you consider what blind spots you are creating for yourself. You can’t assume perfect positioning from someone who doesn’t know where his opponents are. This doesn’t mean a defence with poor vision can’t work, but you will need to work out how to mitigate this disadvantage. Second, scout whenever you can (e.g. while deactive).

Next time

Big thanks to everyone who contributed to this article and to anyone who has taken the time to read through the whole thing. If this sort of analysis is something you would be interested in contributing to, let me know. Next time we’ll be looking at one of the bases at Xtreme in Auckland. This base has recently been updated and I (along with most of the contributors) have never played in it. It should be interesting to see what comes up.